This weekend I’m going to FOSDEM 2016, a two-day event organised by volunteers at the Université Libre de Bruxelles to promote the widespread use of free and open source software. In the past I have been at this conference as a participant and this year I am really happy to contribute with a talk .
I regularly log into different Linux machines on the cloud and find complicated to identify on which machine I am by looking at the bash prompt. In fact, in cloud environments the bash prompt tends to show an ugly internal IP address which I can never memorize. Plus, I always fear to log into the production environment by mistake and run experimental commands intended to be executed in the development environment.
In order to overcome my fears, I put together few lines of bash code to be added at the beginning of ~/.bashrc:
# get public IP address
alias myip="curl -s http://whatismyip.akamai.com"

# display environment in bash prompt
case $(myip) in
    1.2.34.567 ) PS1="[\u@\h DEV \W]\$ "
        ;;
    1.2.34.568 ) PS1="[\u@\h STAGE \W]\$ "
        ;;
    1.2.34.569 ) PS1="[\u@\h LIVE \W]\$ "
        ;;
    * ) PS1="[\u@\h OTHER \W]\$ "
        ;;
esac
Line 2 retrieves the IP address from an external web service and map it to myip. Lines 5-14 modify the bash prompt (PS1) based on the value of myip and each IP address (e.g. 1.2.34.567) is mapped to a string appearing in the prompt (e.g. DEV).
While using cloud services like AWS it sometimes occurs to transfer files from a local machine to a remote server which is only accessible via SSH keys. Linux utilities like rsync and scp come to rescue in this case. Here is an example of how to transfer files via rsync.
First, make sure that the destination folder on the remote server is writeable. If not, log into the remote server and change the permissions, e.g.:
sudo chmod 777 /home/ec2-user/destination_folder
Then go back to the local machine and transfer the file to the remote machine:
rsync -a --progress -e "ssh -i your_ssh_key.pem" file.zip ec2-user@52.1.234.567:/home/ec2-user/destination_folder
where your_ssh_key.pem is the SSH private key to access the remote server, file.zip is the file to transfer, ec2-user is the user on the remote server, 52.1.234.567 is the IP address of the remote server, and /home/ec2-user/destination_folder is the folder on the remote server where you want to transfer the file to.
rsync is a truly file synchronization tool and comes with lots of options, look at its man page for more examples.
Following on a previous blog post on drawing fractals with LaTeX, today I am going to plot functions using LaTeX. As in the previous post, let’s start by preparing the LaTeX environment from scratch:
The pgfplots package for plotting functions and the standalone package for displaying the graph in a single document need to be installed manually as they are not currently present in the Ubuntu repositories:
# navigate to your local texmf folder (could also be ~/texmf or ~/.texmf)
cd ~/.texmf-var
# download the pgfplots package
wget http://sourceforge.net/projects/pgfplots/files/pgfplots/1.7/pgfplots_1.7.tds.zip/download
# unzip it in the texmf folder
unzip pgfplots_1.7.tds.zip -d .
# download the standalone package
wget  http://mirrors.ctan.org/install/macros/latex/contrib/standalone.tds.zip
# unzip it in the texmf folder
unzip standalone.tds.zip -d .
# update the texmf folder
texhash ~/.texmf-var
# remove the zip files
rm standalone.tds.zip pgfplots_1.7.tds.zip
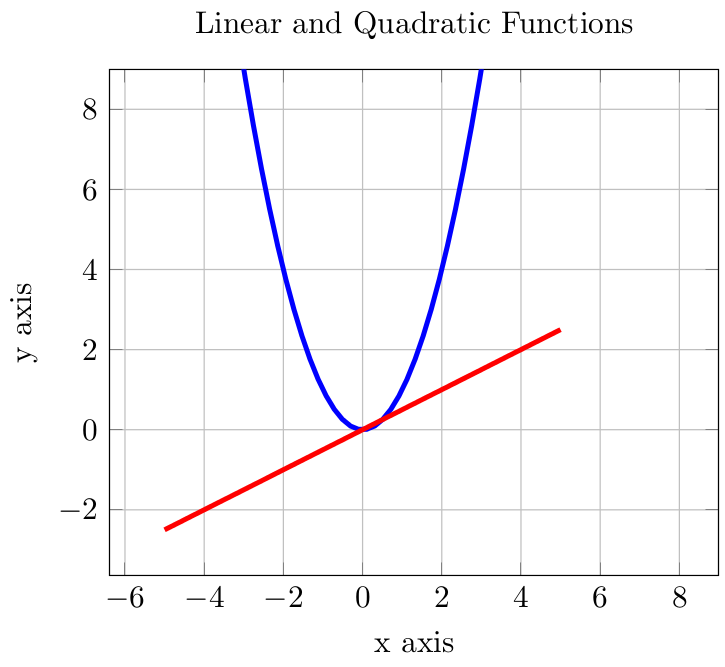
To get started I am going to plot two simple functions which can be mathematically expressed as follows:
y = x * x
y = x / 2
The first function is a linear function whose graph is a straight line. The second one is a quadratic function whose graph is a parabola. Here is the code to plot them with LaTeX:
To compile the tex file into pdf from the command line you can use the latexmk utility previously installed and open the generated file with your preferred PDF editor (I use evince here).
The plotted functions look like this (and like this in PDF):
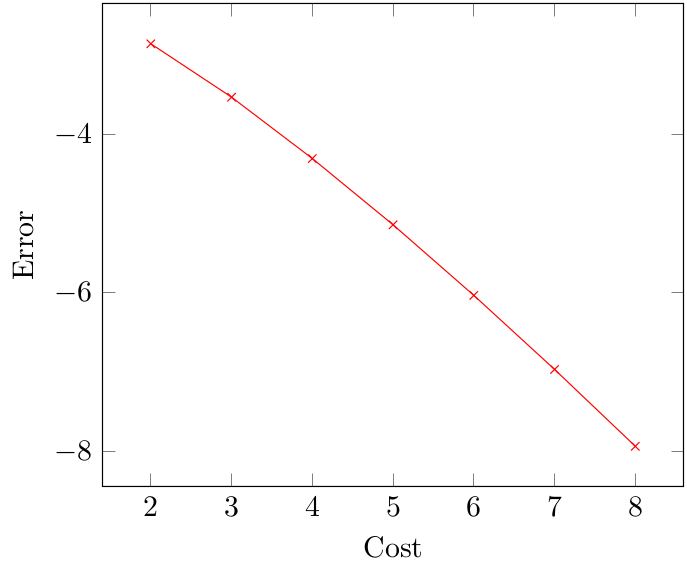
The next graph is obtained by joining a sequence of points whose coordinates on the x and y axis are clearly visible in the code (this example is adapted from the beautiful PGFPlots Gallery):
The plotted function looks like this (and like this in PDF):
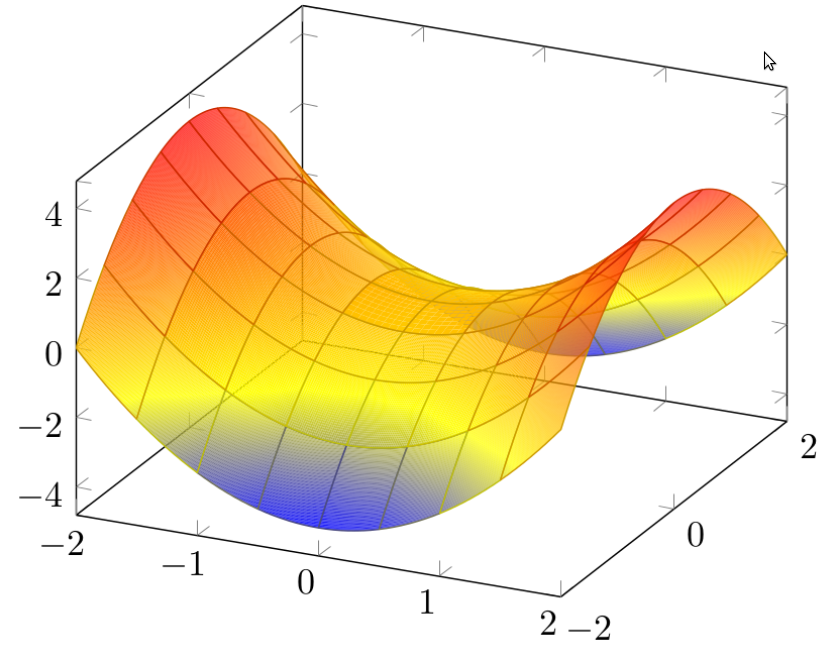
Finally, I’m going to draw a saddle surface. This is an example of hyperbolic geometry, a non-Eucledian geometry where the postulate of parallel lines doesn’t hold. Popular examples of hyperbolic geometry are the Pringles crisps and print works by the Dutch artist M. C. Escher. So here is the LaTeX code to generate a saddle surface:
Oxford University Press (OUP) recently started the Oxford Global Languages (OGL) initiative which aims at providing language resources for digitally under represented languages. In August 2015 OUP launched two African languages websites for Zulu and Northern Sotho. The backend of these websites is based on an API retrieving data in RDF from a triple store and delivering data to the frontend in JSON-LD.
The entire micro-service infrastructure for development, staging, and production runs on Docker containers in Amazon EC2 instances. In particular, we use Jenkins to rebuild the Docker image for the API based on a Python Flask application and Docker Compose to orchestrate the containers. A typical CI workflow is as follows:
– a developer commits code to the codebase
– Jenkins triggers a job to run unit tests
– if the unit tests are successful, the Docker image of the Python Flask application is rebuilt and the container is restarted via Docker Compose
– if the unit tests or the Docker build failed, the monitor view shows the Jenkins jobs in red and displays the name of the possible culprit who broke the build.
Here is a live demo of the Continuous Integration workflow, sample code is available on GitHub.
Mantis BT is a popular bug tracking system. It may not have a flashy user interface when compared to other bug tracking systems like JIRA but it is intuitive, simple to use, easy to install (it’s written in PHP and is often present in one-click installers like softaculous), free (as in beer and as in software) and open source, and gets the job done.
Mantis BT has been extended with plugins allowing to implement an agile workflow. Here I’m going to review three of these plugins. I’m not going into details with the installation as each plugin is fairly well documented.
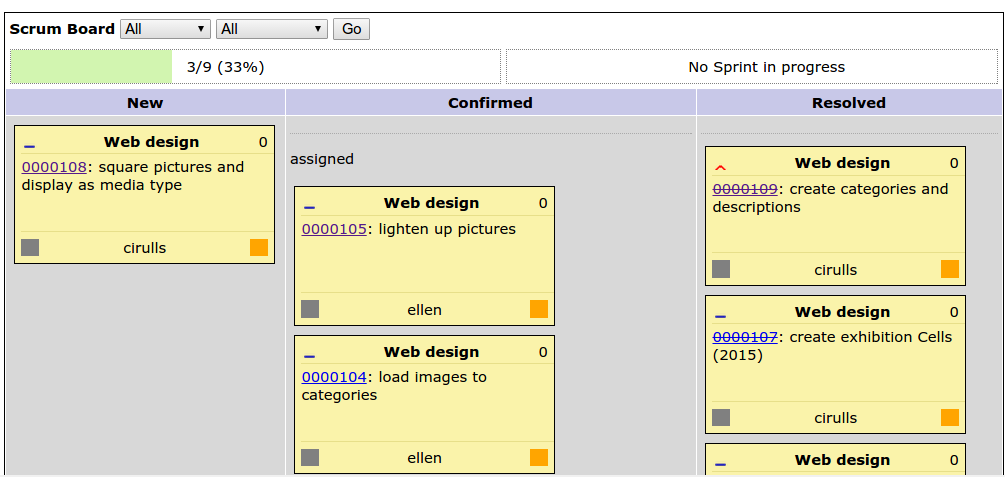
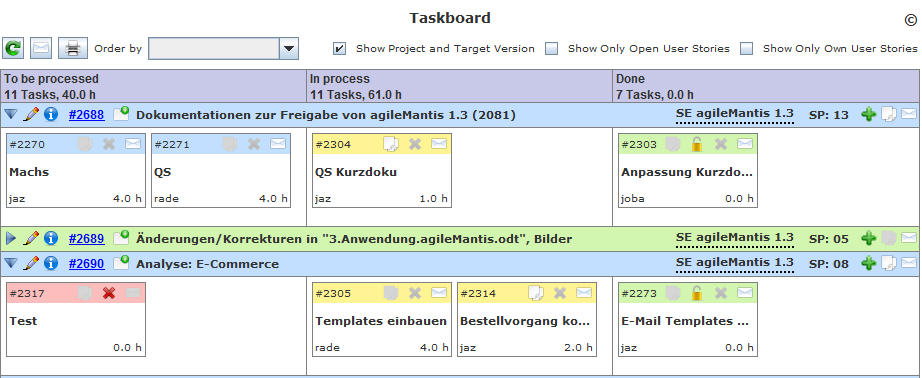
Scrum Board does what it’s written on the tin: it provides a simple board based on Mantis fields like status and category. Here is a screenshot:
The columns in the board are based on Mantis statuses (new, assigned, resolved) and you can filter the scrum board by project, target version, and categories. It’s a no-nonsense, no-frills board but you don’t get much more than that.
Verdict
+ Good if all you need is a scrum board
– It’s just a board, no other agile tools included
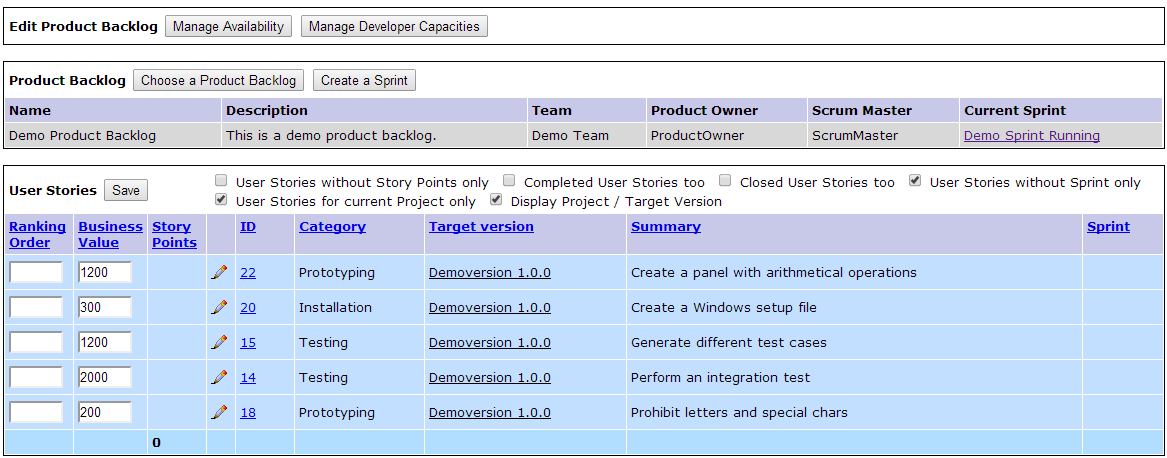
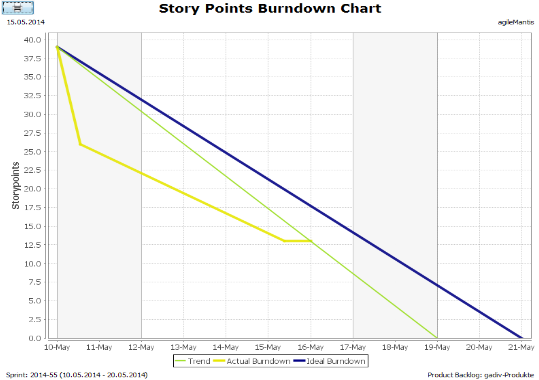
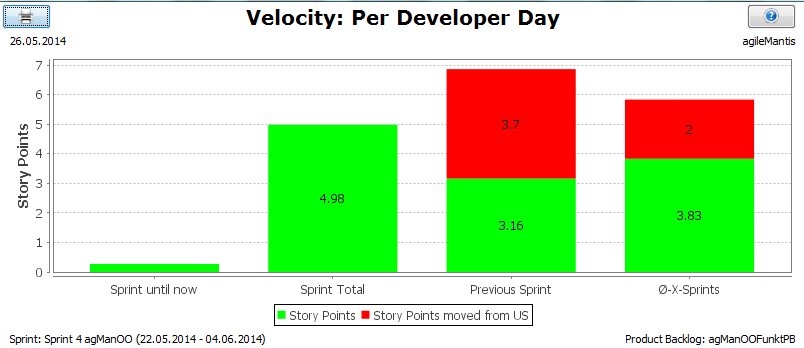
This is probably the most comprehensive set of agile tools for Mantis. It supports scrum roles, sprints, backlogs, user stories, estimates, capacity, and all that agile jazz. The expert components provide additional graphical components such as taskboards, burndown and velocity charts, statistics, etc. and they are integrated in the familiar Mantis user interface. It takes a little bit of a learning curve to learn agileMantis especially if you’re not used to agile but the documentation is well written with examples and tutorial to set everything up.
While the basic installation is free and open source, the expert components are not free and the license is also quite expensive: according to their license calculator, 5 users for 12 months cost 508.37 euros – frankly, you’d be better off buying a self-hosted JIRA Agile license for 10 users for 20 US dollars.
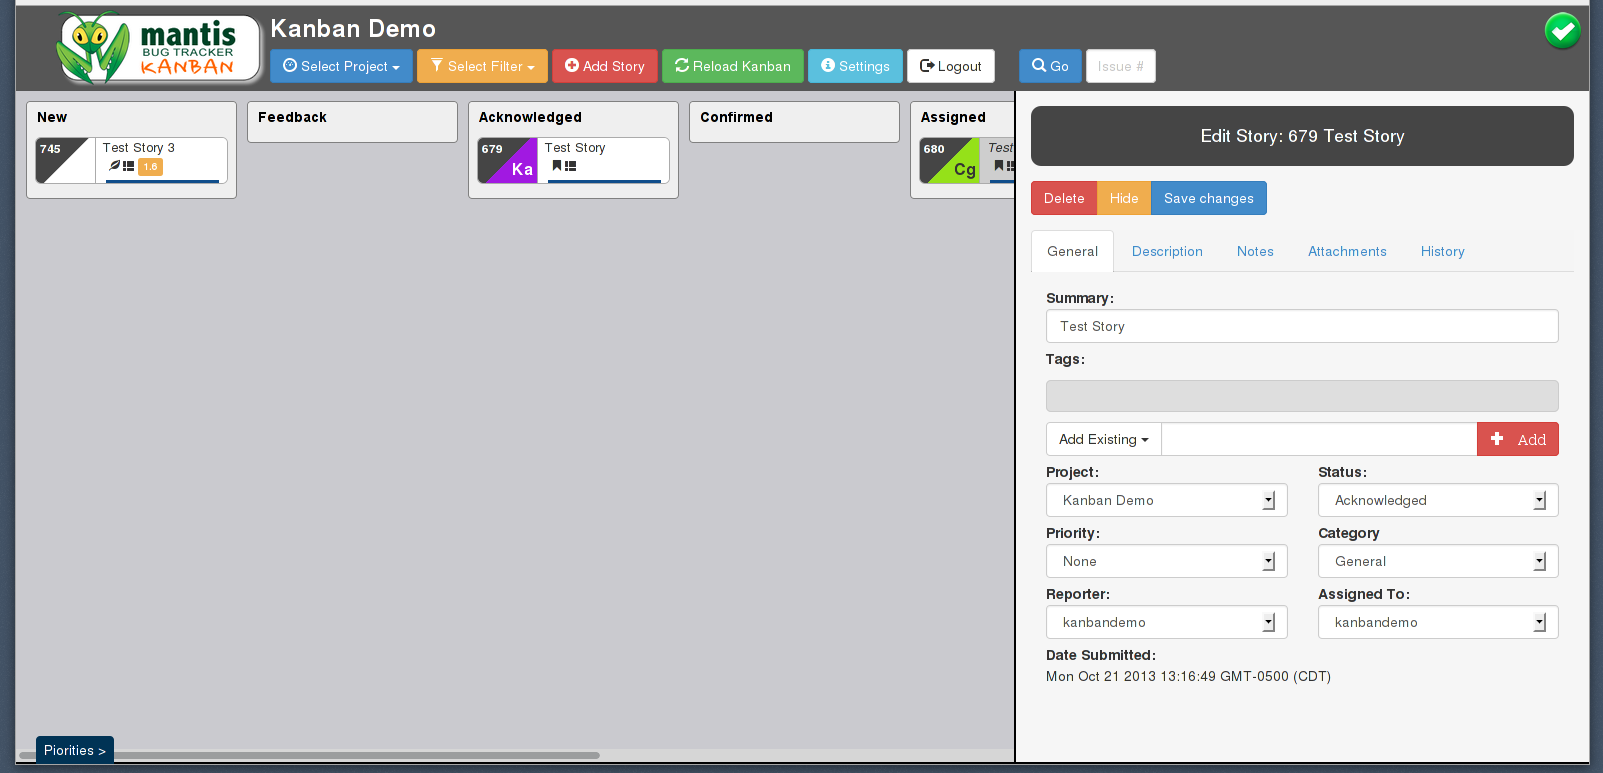
This is an interesting project that aims to bring Kanban to Mantis whilst modernising the Mantis user interface. It makes use of mantisconnect in order to connect to an existing Mantis installation and adds JavaScript and AJAX to provide a flashier interaction with the taskboard and a more modern look and feel.
The documentation is a little bit minimal but it’s not too complicated to get it work once you connect to the Mantis installation (you should set up the connection to something like http:///hostname.com/subfolder/api/soap/mantisconnect.php). If you have a small screen, bear in mind that you have to reduce the font size otherwise you won’t see all the functionalities.
Despite its name, Mantis Kanban can be configured for both scrum and kanban. However, all you get is a nice taskboard and a flashier interface as Mantis Kanban does not provide agile tools like burndown and velocity charts, statistics and the like.
Fractals are mathematical sets showing a repeating pattern at every scale. Fractal patterns are fascinating and are commonly found in nature, for example in cauliflowers, broccoli, lungs, or trees.
LaTeX can generate complex fractals with few lines of code but needs some packages to do that. So let’s prepare the LaTeX environment from scratch by installing all the necessary packages (and prepare a cup of coffee in the meantime):
The standalone package needs to be installed manually as it is not currently present in the Ubuntu repositories:
# navigate to your local texmf folder (could also be ~/texmf or ~/.texmf)
cd ~/.texmf-var
# download the standalone package
wget  http://mirrors.ctan.org/install/macros/latex/contrib/standalone.tds.zip
# unzip it in the texmf folder
unzip standalone.tds.zip -d .
# update the texmf folder
texhash ~/.texmf-var
# remove the zip file
rm standalone.tds.zip
I noticed that PDF readers like evince and okular do not always show the generated fractals in high definition whereas Adobe Reader always does. If you experience the same issue install Adobe Reader:
To compile the tex file from the command line you can use the latexmk utility previously installed. I noticed that evince and okular don’t show this fractal in high definition so it’s better to open it with Adobe Reader.
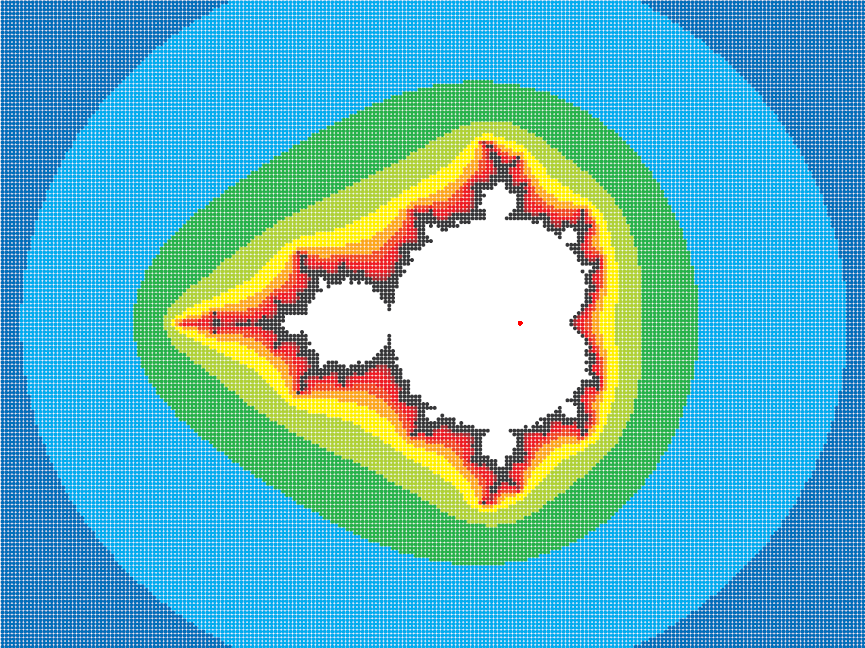
The fractal looks like this (and like this in PDF):
Mandelbrot set
Another approach is to use the pst-fractal package based on the PSTricks package which is more powerful (but slower to compile) than the tikz package. Here is the code using pst-fractal:
You should compile it with xelatex and wait a bit more until you get the message Output written on filename.pdf (1 page) . This time you can open it in high definition also with evince or okular:
KeePass is one of my favourite software. It is a password manager which allows to store secure passwords and forget about them. All you need to do is to remember one single (strong) password to open the software and that’s it. Considering the amount of passwords one has to remember these days, there is a bad tendency to use weak memorable passwords – or even worse always the same password! KeePass is good choice since it is cross-platform, uses strong encryption algorithms, and can store data offline.
I’m currently using KeePass2 (update: I now use KeePassX) However, I noticed that if you install KeePass via the Ubuntu Software Center you won’t necessarily install the latest version and you won’t get the latest updates automatically. So here is the procedure to overcome this problem.
First, add the KeePass repository. For example, in Ubuntu:
where precise is the codename of the Ubuntu version (here 12.04 Precise Pangolin). If you don’t know the codename of the Linux version find it out with:
lsb_release -a
Then update the repository directory and install KeePass2:
sudo apt-get update
sudo apt-get install keepass2
Finally, open KeePass, click on on Help -> Check for updates and KeePass2 will update to the latest stable version. From now on, Ubuntu will update it automatically.
Update: I’m now using KeePassX which is a native port of KeePass for Linux and Mac OS.
Vim is my favourite text editor. It takes a bit of a learning curve to get used to its quirks but it is time well spent if you are doing lots of stuff on the command line or don’t have access to a GUI. I never used emacs so I won’t go into the editor war.
Macros in vim allow to record a sequence of commands and play them back in one go. Here is a cheat sheet adapted from vim tips:
qa       start recording to register a
...      enter a sequence of commands
q        stop recording
@a       execute the macro
@@       execute the macro again
Macros allow to automate complex sequences of vim commands and there is much more to it than this simple cheat sheet. Practical Vim dedicates a full chapter to the subject and it’s a good place to start if you want to delve into the magic world of vim macros.