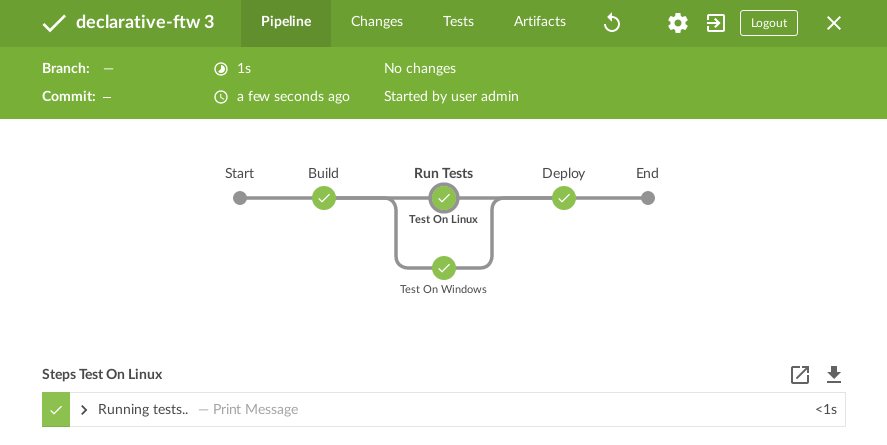
As I’m using more and more often Jenkins Pipelines, I found the need to validate a Jenkinsfile in order to fix syntax errors before committing the file into version control and running the pipeline job in Jenkins. This can saves some time during development and allows to follow best practices when writing a Jenkinsfile as validation returns both errors and warnings.
There are several ways to validate a Jenkinsfile and some editors like VS Code even have a built-in linter. Personally, the easiest way I found is to validate a Jenkinsfile is to run the following command from the command line (provided you have Jenkins running somewhere):
curl --user username:password -X POST -F "jenkinsfile=<Jenkinsfile" http://jenkins-url:8080/pipeline-model-converter/validate
Note the following:
If your Jenkins is authenticating users, you need to pass the username and password otherwise you can omit that part.
By default, this command expects your Jenkinsfile to be called Jenkinsfile. If not, change the name in the command.
Replace jenkins_url and possibly port 8080 based on the URL and port where you are running Jenkins. You can also use localhost as URL if you are running Jenkins on your machine.
If the Jenkinsfile validates, it will show a message like this one:
Jenkinsfile successfully validated.
Or, if you forgot to use steps within stage in your Jenkinsfile, the validation will flag an error like this:
Errors encountered validating Jenkinsfile:
WorkflowScript: 10: Unknown stage section "git". Starting with version 0.5, steps in a stage must be in a ‘steps’ block. @ line 10, column 9.
           stage('Checkout Code') {
           ^

WorkflowScript: 10: Expected one of "steps", "stages", or "parallel" for stage "Checkout Code" @ line 10, column 9.
           stage('Checkout Code') {
           ^
Serverless is gaining attention as the next big thing in the DevOps space after containers. Developers are excited because they don’t have to worry about servers any more; Ops may be sceptical and slightly worried to hear about a world without servers (and sys admin maintaining them). Can these two worlds co-exist? Can serverless just be another tool in the DevOps toolkit?
I recently implemented a real use case at work where we took advantage of an event-driven workflow to trigger Jenkins jobs originally created to be executed manually or on a schedule. The workflow is as follows:
1. New data is uploaded to an S3 bucket
2. The S3 event calls a lambda function that triggers a Jenkins job via the Jenkins API
3. The Jenkins job validates the data according to various criteria
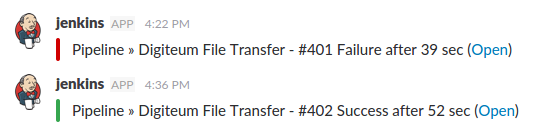
4. If the job passes, the data is upload on an S3 bucket and a successful message is sent to a Slack channel
5. If the job fails, a message with a link to the failed job is sent to a Slack channel
Jenkins User
Let’s start by creating a new user with the correct permissions in Jenkins. This allows to restrict what the lambda function can do in Jenkins.
In Manage Jenkins -> Manage Users -> Create User I create a user called lambda:
In Manage Jenkins -> Configure Global Security -> Authorization -> Matrix-based Security add the user lambda to User/group to add and set the permissions as in the matrix below:
This is a minimum set up and allows the lambda user to build jobs. According to your security policies, you may want to further restrict the permissions of the lambda user in order to run only some specific jobs (you may need role based authentication for setting this up).
AWS IAM Role
Now let’s move to AWS and set up a IAM Role for the lambda function. Head to IAM -> Roles and create a new roles with the following policies (my role name is digiteum-file-transfer , sensitive information is obfuscated for security reasons):
This role allows to execute lambda functions, access S3 buckets as well as the Virtual Private Cloud (VPC).
S3 Configuration
I create an empty S3 bucket using the wizard configuration in S3 and name it gadictionaries-leap-dev-digiteum. This is the bucket that is going to trigger the lambda function.
AWS Lambda Configuration
Finally, let’s write the lambda function. Go to Lambda -> Functions -> Create a Lambda Function. Select Python 2.7 (read Limitations to see why I’m not using Python 3) as runtime environment and select a blank function.
In Configure Trigger, set up the trigger from S3 to Lambda, select the S3 bucket you created above (my S3 bucket is named gadictionaries-leap-dev-digiteum ), select the event type to occur in S3 (my trigger is set to respond to any new file drop in the bucket) and optionally select prefixes or suffixes for directories and file names (I only want the trigger to occur on XML files). Here is my trigger configuration:
In Configure Function, choose a name for your function (mine is file_transfer ) and check out the following Python code before uploading it:
from __future__ import print_function

import json
import urllib
import boto3
import jenkins
import os

print('Loading lambda function')
s3 = boto3.client('s3')
# TODO: private IP of the EC2 instance where Jenkins is deployed, public IP won't work
jenkins_url = 'http://123.45.56.78:8080/'

# TODO: these environment variables should be encrypted in Lambda
username = os.environ['username']
password = os.environ['password']

def lambda_handler(event, context):

    # Get the S3 object and its filename from the S3 event
    bucket = event['Records'][0]['s3']['bucket']['name']
    filename = urllib.unquote_plus(event['Records'][0]['s3']['object']['key'].encode('utf8'))
    try:
        # Connect to Jenkins and build a job
        server = jenkins.Jenkins(jenkins_url, username=username, password=password)
        server.build_job('Pipeline/Digiteum_File_Transfer', {'filename': filename})
        return 'Job Digiteum File Transfer started on Jenkins'
    except Exception as e:
        print(e)
        print('Cannot connect to Jenkins server or run build job')
        raise e
Note the following:
Line 6 imports the python-jenkins module. This module is not in Python’s standard library and needs to be provided within the zip file (more on this in a minute).
Line 12 sets up the URL of the EC2 instance where Jenkins is deployed. Note that you need to use the private IP address as shown in EC2, it won’t work if you use the public IP address or the Elastic IP address.
Lines 15 and 16 set up the credentials of the Jenkins user lambda. The credentials will be exposed to the lambda function as environment variables and, unlike in this example, it is recommended to encrypt them.
Lines 18-31 contain the handler function that is triggered automatically by a new file upload in the S3 bucket. The handler function does the following:
retrieve the filename of the new file uploaded on S3 (lines 21-22)
log into Jenkins via username and password for the lambda user (line 25)
build the job called Digiteum_File_Transferin the folder Pipeline (line 26)
throw an error if it can’t connect to Jenkins or start the job (lines 28-31)
As an example, here is the zip file to upload in Configure Function. It contains the lambda function and all the Python modules needed, including the python-jenkins module. Make sure you edit the private IP address of your Jenkins instance in line 12. If you need to install additional Python modules, you can follow these instructions.
Here is how my Configure Function looks like:
Note the name (it should read file_transfer instead of file_transfe ), the handler (as in the Python code above), and the role (as created in IAM). Note also that the username and the password of the Jenkins user lambda are provided as environment variables (ideally, you should encrypt these values by using the option Enable encryption helpers).
Once you’ve done the basic configuration, click on Advanced Settings. In here you need to select the VPC, subnet, and security group of the EC2 instance where Jenkins is running (all these details about the instance are in EC2 -> Instances). In fact, the lambda function needs to run in the same VPC as Jenkins otherwise it cannot connect to Jenkins. For example, here is how my advanced settings look like (sensitive information is obfuscated):
Finally, review your settings and click on Create Function.
Test the Lambda Function
Once you created a lambda function, configure a test event to make sure the lambda function behaves as intended. Go to Actions -> Configure test event and select S3 Put to simulate a data upload in the S3 bucket. You need to replace the bucket name (in this example gadictionaries-leap-dev-digiteum) and the name of an object in that bucket (in this example I uploaded a file in the bucket and called it test.xml). Here is a test example to adapt:
Click on Save and Test and you should see the lambda function in action. Go to Jenkins and check that the job has been executed by user lambda . If it doesn’t work, have a look at the logging in AWS Lambda to debug what went wrong.
Slack Configuration
Finally, I set up a Slack integration in Jenkins so that every time the Jenkins job is executed, a notification is sent to a Slack channel. This also allows several people to get notified about a new data delivery.
First, install and configure the Slack plugin in Jenkins following the instructions on the GitHub page. The main configuration is done in Manage Jenkins -> Configure System -> Global Slack Notifier Settings. For example, this is my configuration:
Note that:
Team Subdomain is the name of your Slack account
Channel is the name of your default slack channel (you can override this in every job)
Integration Token Credential ID is created by clicking Add and creating a token in Jenkins’ credentials. As the message says, it is recommended to use a token for security reasons. Here is an example of a Token Credential ID for Slack in Jenkins:
You typically want to add a notification to a specific Slack channel in your Jenkins job as a post-build action in order to notify the result of a job. In Jenkins go to your job’s configuration, add Post-build Actions -> Slack Notifications and use settings similar to these:
This sends a notification to the Slack channel (either the default one set in Global Slack Notifier Settings or a new one set here in Project Channel) every time a job passes or fails. When a notification is sent to Slack, I will look like this:
Now you can keep both technical and non-technical users informed without having to create specific accounts on Jenkins or AWS or spamming users with emails.
Limitations
I ran into two problems that I was not yet been able to solve due to lack of time. I want to flag them as they can improve the lambda function and make it more maintainable. If anyone want to help me to fix this, please send me your comments.
Encryption: I tried to encrypt the Jenkins password but I could not make the lambda function decrypt the password. I set up an encryption key in IAM -> Encryption keys -> Configuration -> Advances settings -> KMS key and pasted the sample code in the lambda function but the lambda function timed out without giving an error message. I imported the b64decode module from base64 in the Python code but there must be an issue with this instructions that decrypts the variable ENCRYPTED :
Python 2.7: I wanted to use Python 3 but I had issues with the installation of some modules. Therefore I used Python 2.7 but the code should be compatible with Python 3 (apart from the imported modules).
Conclusion
Integrating AWS Lambda and Jenkins requires a little bit of configuration but I hope this tutorial may help other people to set it up. If the integration needs to be done the other way round (i.e. trigger a lambda function from a Jenkins job), check out the AWS Lambda Plugin.
I believe integrating AWS Lambda (or any FaaS) with Jenkins (or any CI/CD server) is particularly suited for the following uses cases:
Organisations that already have some DevOps practices in place and a history of build jobs but want to take advantages of the serverless workflow without completely re-architecturing their infrastructure.
CI/CD pipelines that need be triggered by events but are too complex or long to be crammed in a single function.
This week I’m giving a talk about Continuous Security with Jenkins, Docker Bench, and Amazon Inspector at CD Summit & Jenkins Days in Amsterdam and in Berlin. CD Summit & Jenkins Days are a series of conferences in the US and in Europe focusing on Continuous Integration (CI) and Continuous Delivery (CD).
This is the abstract of my talk:
Security testing is often left out from CI/CD pipelines and perceived as an ad hoc and one-off audit performed by external security experts. However, the integration of security testing into a DevOps workflow (aka DevSecOps) allows to achieve security by design and to continuously assess software vulnerabilities within a CI/CD pipeline. But how does security fit in the world of cloud and microservices?
In this talk I show how to leverage tools like Jenkins, Docker Bench , and Amazon Inspector to perform security testing at the operating system and container levels in a cloud environment and how to integrate them into a typical CI/CD workflow. I discuss how these tools can help assessing the risk of security vulnerabilities during development, improving security and compliance, and lower support costs in the long term.
Amazon Inspector is an automated security assessment service on Amazon Web Services (AWS). It allows to identify security vulnerabilities at operating system and network levels by scanning the host against a knowledge base of security best practices and rules.
I recently integrated Amazon Inspector to run in a Jenkins job so that security testing can be automated and performed prior to deployment to production.
AWS Configuration
The first thing to do is to set up the assessment target and assessment template in Amazon Inspector. An assessment target allows to select the EC2 instances via their tags in order to include them in the security scan. Here is an example of my assessment target for the EC2 instances tagged as gadictionaries-leap-ogl-stage-v360 :
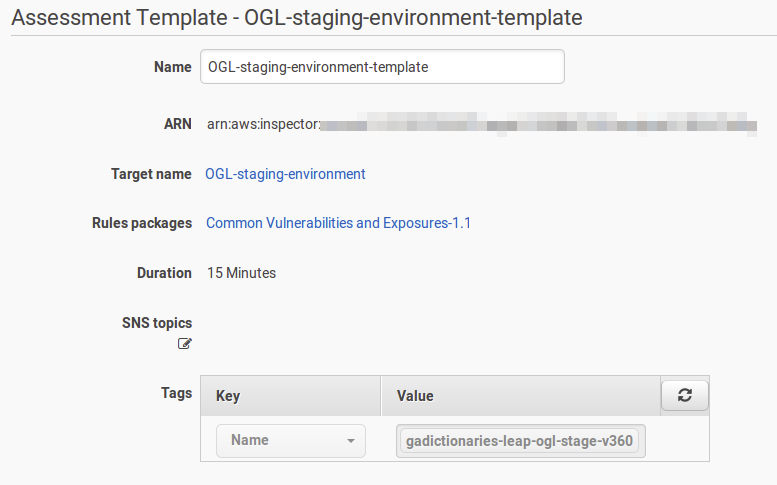
The assessment template allows to specify the type of scan and its duration and is linked to the assessment target set up above. Here is an example of my assessment template (ARN is masked for security reasons). I selected the Common Vulnerabilities and Exposures (CVE) rule package scanning for 15 minutes (one hour is the recommended duration time to reliable results).
Jenkins Configuration
We now move to the Jenkins configuration in order to run the security scan via a Jenkins job instead of using the AWS console.
The first thing to do is to make sure that openssh is installed on the instance where Jenkins is running and on the host you want to check. For example, on Ubuntu you can install openssh with:
sudo apt-get install openssh-server
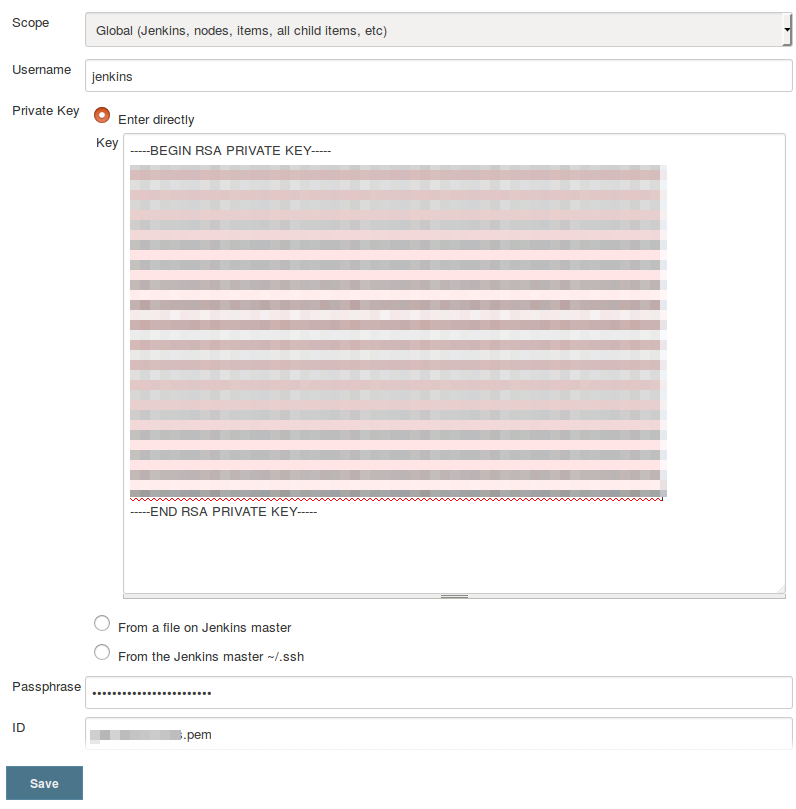
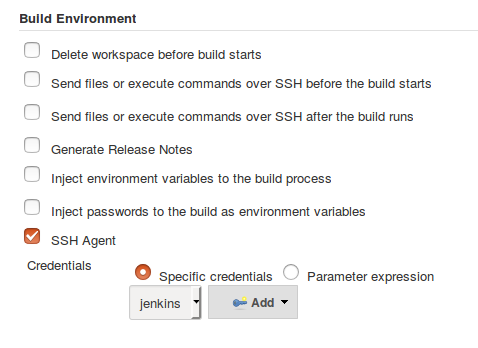
Then install the SSH Agent plugin in Jenkins. This will provide Jenkins with SSH credentials to automatically login into a machine on the cloud. Add the credentials in Jenkins -> Credentials -> System -> Global credentials (unrestricted) -> Add credentials -> SSH Username with private key. This is an example of my credentials for user jenkins (private key details are obfuscated):
Then create a Jenkins job and select the SSH agent credentials for user jenkins in Build Environment:
This will allow Jenkins to ssh into the machine with the private key stored securely (make sure you only grant permission to configure Jenkins to administrators otherwise your private keys are not safe).
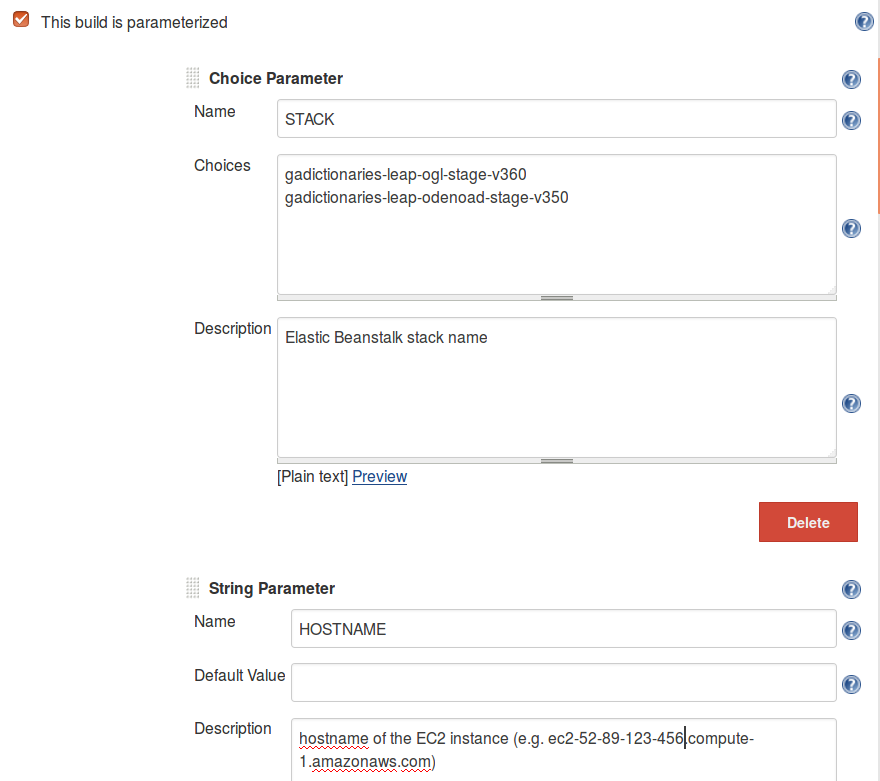
I like to parameterize my builds so that I can run Amazon Inspector on a specific EC2 instance within a given Elastic Beanstalk stack:
Then we set up build and post-build actions. The build executes a shell script invoke_aws_inspector.sh pulled from the version control system. The post-build action provides the location of the JUnit file.
The shell script invoke_aws_inspector.sh looks like this:
# check parameters expected from Jenkins job
if [[ -n "$HOSTNAME" ]] && [[ -n "$STACK" ]]; then
	# install and start AWS Inspector agent on host
	ssh -T -o StrictHostKeyChecking=no ec2-user@$HOSTNAME << 'EOF'
	curl -O https://d1wk0tztpsntt1.cloudfront.net/linux/latest/install
	sudo bash install
	sudo /etc/init.d/awsagent start
	sudo /opt/aws/awsagent/bin/awsagent status
	exit
EOF
	# run AWS Inspector from localhost
	export AWS_DEFAULT_REGION=us-east-1
	python execute_aws_inspector.py

	# stop and uninstall AWS Inspector agent on host
	ssh -T -o StrictHostKeyChecking=no ec2-user@$HOSTNAME << 'EOF'
	sudo /etc/init.d/awsagent stop &&
	sudo yum remove -y AwsAgent
EOF
else
    echo "ERROR! Parameters HOSTNAME and STACK required from Jenkins job security_checks_aws_inspector"
    exit 1
fi
The shell script works as follows:
line 4 allows Jenkins to ssh into a host (I’m using AWS EC2 as you can guess by the username ec2-user, replace it with your default username but do not user root). Note that the environment variable $HOSTNAME is passed from the parameter we set up earlier. The EOF allows to run a sequence of commands directly on the host so that you don’t have to disconnect every time. The single quotes are important, don’t skip them!
lines 5-8 install and start the Amazon Inspector agent on the host
lines 12-13 configure and set up a Python script execute_aws_inspector.py for running Amazon Inspector (we’ll see it in a minute)
lines 16-18 remove the Amazon Inspector agent so that no trace is left on the host
the final EOF disconnect Jenkins from host
The Python script execute_aws_inspector.py uses the Boto3 library for interacting with AWS services. The script looks like this:
import boto3
import os, sys
import datetime, time
import xml.etree.cElementTree as etree

# initialize boto library for AWS Inspector
client = boto3.client('inspector')

# set assessment template for stack
stack = os.environ['STACK']

if stack == 'gadictionaries-leap-ogl-stage-v360':
	assessmentTemplate  = 'arn:aws:inspector:us-east-1:XXXXXXXXXXXXX:target/XXXXXXXXXXXXX/template/XXXXXXXXXXXXX'
elif stack == 'gadictionaries-leap-odenoad-stage-v350':
	assessmentTemplate  = 'arn:aws:inspector:us-east-1:XXXXXXXXXXXXX:target/XXXXXXXXXXXXX/template/XXXXXXXXXXXXX'
else:
	sys.exit('You must provide a supported stack name (either gadictionaries-leap-ogl-stage-v360 or gadictionaries-leap-odenoad-stage-v350')

# start assessment run
assessment = client.start_assessment_run(
	assessmentTemplateArn = assessmentTemplate,
	assessmentRunName = datetime.datetime.now().isoformat()
)

# wait for the assessment to finish
time.sleep(1020)

# list findings
findings = client.list_findings(
	assessmentRunArns = [
		assessment['assessmentRunArn'],
	],
	filter={
		'severities': [
			'High','Medium',
		],
	},
	maxResults=100
)

# describe findings and output to JUnit
testsuites = etree.Element("testsuites")
testsuite = etree.SubElement(testsuites, "testsuite", name="Common Vulnerabilities and Exposures-1.1")

for item in findings['findingArns']:
	description = client.describe_findings(
		findingArns=[
			item,
		],
		locale='EN_US'
	)

	for item in description['findings']:
		testcase = etree.SubElement(testsuite, "testcase", name=item['severity'] + ' - ' + item['title'])
		etree.SubElement(testcase, "error", message=item['description']).text = item['recommendation']

tree = etree.ElementTree(testsuites)
tree.write("inspector-junit-report.xml")
The Python script works as follows:
lines 10-17 read the environment variable set in the parameterized build and select the correct template (I set up two different template for two different stacks, the ARNs are obfuscated for security reasons)
lines 20-26 run the assessment template and waits a bit longer than 15 minutes so that the scan can finish
lines 29-39 filters findings with severities High and Medium
lines 42-58 serialize the findings into a JUnit report so that they can be automatically read by Jenkins
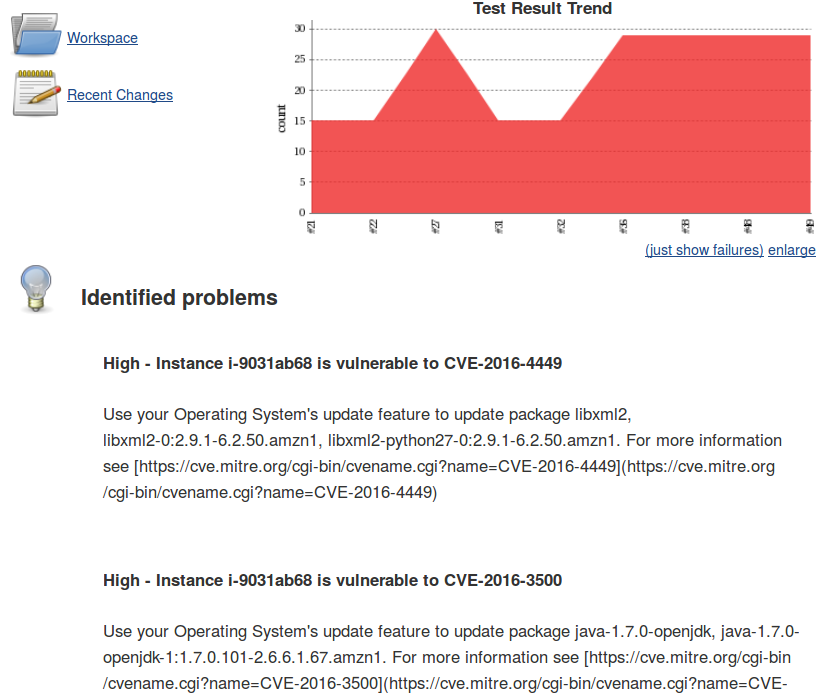
Finally, here is an example of Test Result Trend and JUnit test results showing security vulnerabilities on an EC2 instance running unpatched packages:
Happy security testing with Jenkins and Amazon Inspector!
Docker Bench is an open source tool for automatically validating the configuration of a host running Docker containers. The tool has been written among others by Diogo Mónica, security lead at Docker, and performs security checks at the container level following Docker’s CIS Benchmark recommendations.
As you would expect, the easiest way to run Docker Bench is via a Docker container. Just make sure you have Docker 1.10 or better, download the Docker image:
This will automatically generate some output as in the animated gif above with an assessment of possible Docker security issues.
I recently combined Docker Bench with Jenkins in order to integrate security testing into a typical DevOps workflow on the cloud – call it DevSecOps if you like buzzwords… This requires a little bit of Jenkins configuration but it’s not too difficult to follow.
The first thing to do is to make sure that openssh is installed on the instance where Jenkins is running and on the host you want to check. For example on Ubuntu you can install openssh with:
sudo apt-get install openssh-server
Then install the SSH Agent plugin in Jenkins. This will provide Jenkins with SSH credentials to automatically login into a machine on the cloud. Add the credentials in Jenkins -> Credentials -> System -> Global credentials (unrestricted) -> Add credentials -> SSH Username with private key. This is an example of my credentials for user jenkins (private key details are obfuscated):
Then create a Jenkins job and select the SSH agent credentials for user jenkins in Build Environment:
This will allow Jenkins to SSH into the machine with the private key stored securely (make sure you only grant permission to configure Jenkins to administrators otherwise your private keys are not safe).
I like to parameterize my builds so that I can run Docker Bench on any host reachable with the private key:
Finally, select Execute shell in the build and paste this shell script (you may want to put it under version control and retrieve it from there via Jenkins):
the first command allows Jenkins to ssh into a host (I’m using AWS EC2 as you can guess by the username ec2-user, replace it with your default username but do not user root). Note that the environment variable $HOSTNAME is passed from the parameter we set up earlier. The EOF allows to run a sequence of commands directly on the host so that you don’t have to disconnect every time. The single quotes are important, don’t skip them!
the second command pulls the Docker image for Docker Bench directly on the host
the third command runs Docker Bench on the host
the forth command removes all exited containers from the host, including Docker Bench once it has finished its job
the fifth command remove the Docker image for Docker Bench so that you don’t leave any trace on the host
the final EOF disconnect Jenkins from host
The Jenkins console output shows the result of running Docker Bench on a specific host. Now you have to assess the results as you may see several warnings and they may just be false positives. For example, this warning may be acceptable for you:
[1;31m[WARN][0m 1.5  - Keep Docker up to date
[1;31m[WARN][0m       * Using 1.11.1, when 1.12.0 is current as of 2016-07-28
This means you are not running the latest version of Docker. This may not be an issue (unless Docker released a security release) especially if your Linux distribution hasn’t got the latest version of Docker available in its repositories.
In my case this warning was a false positive:
[1;31m[WARN][0m 2.1 - Restrict network traffic between containers
In fact, I need several containers to communicate between them so that restriction does not apply to my use case.
This warning should be taken much more seriously:
[1;31m[WARN][0m 4.1  - Create a user for the container
[1;31m[WARN][0m      * Running as root: container-name-bbf386c0b301
This means you are running a container as root. This is unsecure as if a nasty intruder manages to get inside the containers s/he can run any command in it. Basically, it’s like running a Linux system as root which is a bad security practice.
Once you have assessed your warnings, you may want to filter out the false positives. For example, you can use the Post build task plugin to make the build fail if the build log output contains a warning that you assessed as a security risk. You can use a regular expression to match the pattern identified above.
It would be good to get the Docker Bench output in JUnit format so that Jenkins can understand it natively but this option is currently not implemented in Docker Bench.
Happy security testing with Jenkins and Docker Bench!
Oxford University Press (OUP) recently started the Oxford Global Languages (OGL) initiative which aims at providing language resources for digitally under represented languages. In August 2015 OUP launched two African languages websites for Zulu and Northern Sotho. The backend of these websites is based on an API retrieving data in RDF from a triple store and delivering data to the frontend in JSON-LD.
The entire micro-service infrastructure for development, staging, and production runs on Docker containers in Amazon EC2 instances. In particular, we use Jenkins to rebuild the Docker image for the API based on a Python Flask application and Docker Compose to orchestrate the containers. A typical CI workflow is as follows:
– a developer commits code to the codebase
– Jenkins triggers a job to run unit tests
– if the unit tests are successful, the Docker image of the Python Flask application is rebuilt and the container is restarted via Docker Compose
– if the unit tests or the Docker build failed, the monitor view shows the Jenkins jobs in red and displays the name of the possible culprit who broke the build.
Here is a live demo of the Continuous Integration workflow, sample code is available on GitHub.
This weekend I am attending XML London at University College London, a 2 day conference on XML and Semantic Web technologies. I am presenting a paper on Continuous Integration for XML and RDF Data. The paper is available here and the slides of my presentation are available here.